I think you all know now benefits to have a custom recovery, such as TWRP, also considering Xiaomi's decision to remove visual recovery on older models. In fact, with the stock recovery, you will not be able to carry out daily "maintenance" operations or to minimize it.
Topics of this article:
A custom recovery was made available, the ZCX-TWRP, which allows you to keep the active OTA updates and then the official ROMs, however, implementing all of them functions of the TWRP.
Let's see how to install it on Xiaomi Mi Note 2!
Recovery ZCX-TWRP for Xiaomi Mi Note 2
Unlike TeamWinRecoveryProject recoveries, ZCX allows full compatibility with official, China and Global ROMs.
- Bootloader unlocked - Guide to unlocking the bootloader
- Fully loaded phone
- ADB folder with all the necessary files: Download ADB folder
Download the ADB folder and unpack the .rar file in a folder that will have the name adb and that will be placed in the path C: / adb.
We must now get the ROM to install through ZCX, unless you want to keep yours. In any case, you will need to download the FULL ROM package .zip currently installed on your device because it will be installed pre-installed.
Then go on Xiaomi forum page for Mi Note 2 and download, from the appropriate thread, the ROM you currently have on your phone. You need to download the Recovery version!

Install ZCX Recovery
Xiaomitoday's staff are free of liability for any damages resulting from procedural errors.
The process is absolutely identical to any fastboot command recovery recovery.
- Let's put the smartphone in fastboot mode (hold volume down and power)
- Connect them to the PC
- Open the adb folder and, holding down the SHIFT key, click with the RIGHT BUTTON of the mouse in a white point of the folder and click on "open a command window here"
- We write fastboot devices and give ENTER
- Let's verify that a string appears next to the word "fastboot"
- Let's write then fastboot flash recovery zcx.img and confirm with ENTER
- We are waiting for the recovery setup process
- We type fastboot boot zcx.img and give ENTER
- We wait for the ZCX recovery to restart
Then take a look at the paragraph at the end of the article.

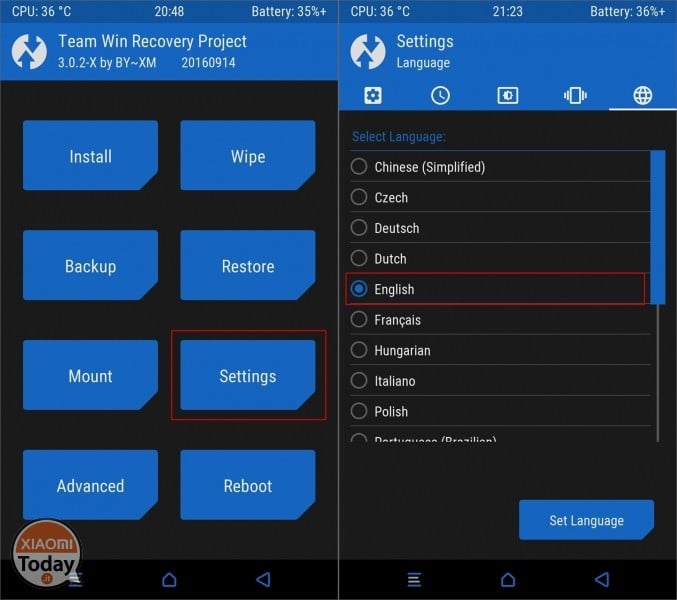
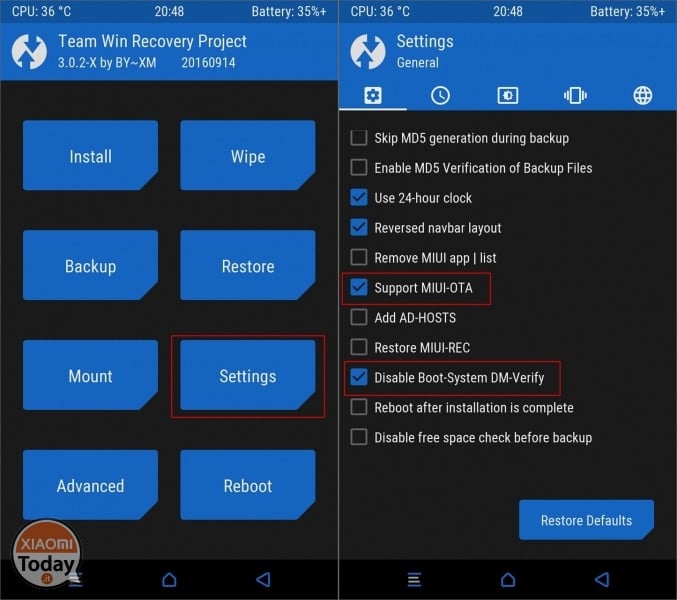
First set of ZCX recovery
Unlike official TWRPs, this ZCX must be set manually for enable OTA updates and to avoid unwanted blocks.
Once restarted in recovery, we will be in front of a screen where we will have to select a box "never show this screen during boot again" and then slide the blue bar down (from now on I will call this action SWIPE).
We will find this in the ZCX start menu, presumably in Chinese.
Below I will share the steps for you to do change the language.
We reach the menu Settings (or settings if you have chosen the Italian language) and we select SUPPORT MIUI-OTA and DISABLE BOOT-SYSTEM DM-VERIFY.
Now we have to install the ROM (in .zip format) already present on the device, which we will have copied to the internal memory of the device, in order to make a backup of the system and boot partitions that will allow the correct installation of subsequent OTA updates.
To install the ROM we go to the menu install from the main screen, select the zip ROM and we do it SWIPE. At the end of the flash, which will not erase the data on the phone, click on Reboot System to restart.

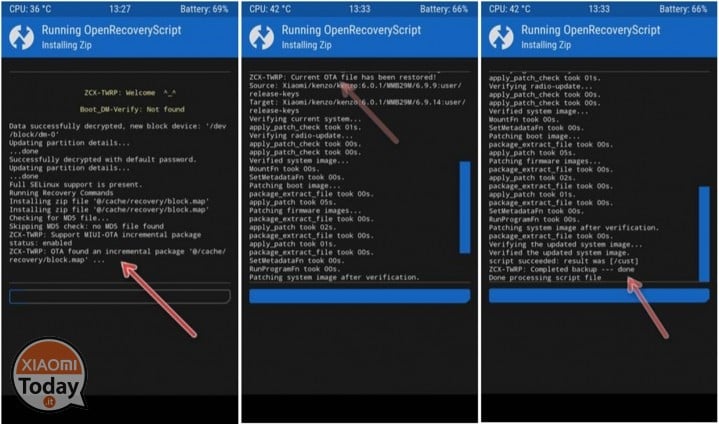
OTA updates with ZCX recovery
When we receive notification of an update, we can proceed with the download directly via Updater and, once download is complete, click on Update, as shown below.
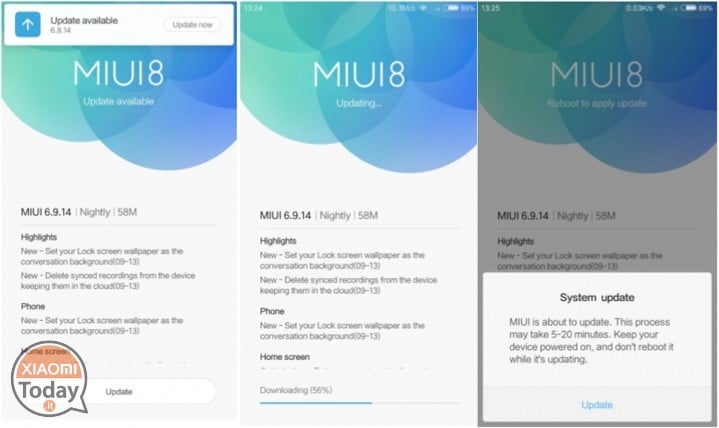
The phone will reboot into ZCX recovery which will automatically start the update.
In case you want make the root of the device, nothing simpler. After the installation of the ROM, do not restart but come back in main menu of the ZCX and selected ADVANCED.
From there select SuperSu and confirm: recovery will automatically install the program that will grant you root permissions (the procedure must be followed after each update).
ERROR 7 resolution during an OTA update
This error stems from having previously used another TWRP and / or from rooting the device by flashing SuperSu .zip.
- Disable driver signatures on your PC (follow the section in this guide);
- downloaded MiFlash on your PC and install it, agreeing to installing fastboot drivers: Download MiFlash Beta;
- download the FASTBOOT version of the ROM currently mounted on your device and extract it from the archive MANDATORY with Winrar: ROM List for Mi Note 2 from the same discussion as you will download the fastboot ROM, also download the FULL ROM (Recovery version). It will serve you later.
- rename the folder containing ROM files as "rom" and put it in C: / rom (be careful not to have two equal folders in the other and do not insert spaces in folder names);
- put your phone in fastboot (volume down and power) and connect it to your PC;
- start MiFlash and click on "refresh" to make sure your device is recognized;
- selected from the top C: / rom path;
- select "clean all" below;
- click on "flash" and wait for the job to complete.
- restart the phone in fastboot mode again and proceed with ZCX setup and setup as described above;
- after the flash of the installed ROM (you have to download the fastboot ROM to install via MiFlash and the FULL ROM to be installed by recovery), go back to recovery (volume on and power) and go to BACKUP: select EFS, MODEM e PERSIST and confirm the backup with the swipe to the right;
- if you like, proceed to root and restart.
Except for complications, installation is not so difficult and you will enjoy the full benefits of TWRP while maintaining active OTA updates.
As always I dedicate part of my free time to writing guides to help less experienced users. If you were satisfied with the guide and the idea you have, you can offer me a beer or a coffee to thank me. No obligation!
![]()